How to Load Brushes in Photoshop Elements
Using brushes on digital scrapbook pages or projects is a fun and easy way to add extra interest to layouts or hybrid crafting projects. Photoshop Elements is one of the most popular programs for digital scrapbookers and it comes with hundreds of options to help you create unique projects including a nice little inventory of built-in brushes to help you get started, but why stop there? Brushes literally open up a whole new world of possibilities for you to expand your own creativity. Brushes allow you to make subtle changes or bold statements with the click of a mouse; and if you’re not happy, CTRL+ Z and you’ll be right back where you started. I love the flexibility brushes provide. You can change the opacity, create custom png files for use on future projects, and even customize your brushes; but we have to know how to load them before we can use them, of course.
3 Methods To Load Brushes in Photoshop Elements
Method #1:
- In the Menu Bar click on Edit > Preset Manager. You have the option to Append or Add.
- If you choose Add, the brushes that are loaded in Photoshop Elements will be replaced with the brush you are adding.
- If you choose Append, the brush you are loading into Elements will be added to what is already available.
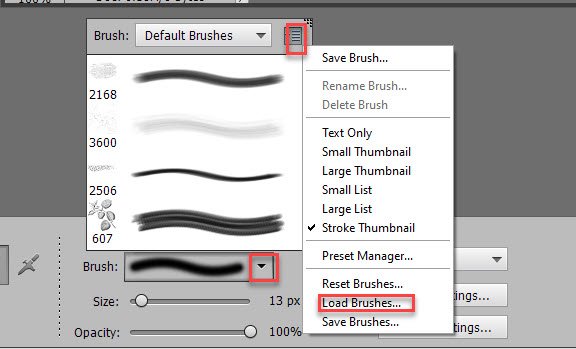
Method #2:
- Get the Brush Tool.
- In the Tool Options, click on the down-pointing arrow in the Brush Picker.
- Click on the 4 horizontal lines in the upper-right corner of the fly-out menu.
- Click on Load Brushes.
- Navigate to the brush you want to load. Click on the brush file (.abr) to select it.
- Click on Load. (See Image 1 at the end of this post).
Method #3 for Windows Users:
With Method #3, you are actually installing a brush into the permanent Photoshop Brushes Preset folder rather than just loading it for temporary use. Be careful about “installing” too many brushes, though, as the presence of an excessive number of brushes can slow your computer down.
- This method requires that you find the Brushes Presets folder on your computer. I am using Windows 10 and this is the path I would follow to install brushes:
This PC > 10Win122017 (C:) > Program Files > Adobe > Photoshop Elements 2021 > Presets > Brushes
Note: To use this method you will need to have hidden files in Window visible. Here’s how to do that: Click on the View tab in File Explorer; put a checkmark in the box in front of Hidden Items; select the View you prefer. I use List.
Instructions for Mac Users:
Vicki Robinson Designs has written out instructions for you and has given me permission to include them in this tutorial:
- Close Photoshop Elements
- Make a copy of the .abr file for the brush set you want to install. Making a copy ensures that you can always find the file again if you need it – be sure to store the original with your other purchased brush sets.
- In Finder, navigate to the Brushes Preset folder: Macintosh HD\Applications\Adobe Photoshop Elements (your version)\Presets\Brushes
- Drag a copy of the .abr file into the Brushes folder. Enter your Mac’s password if prompted to do so.
If brushes are new to you, don’t wait any longer. Load some brushes. Take them for a spin and let your creative juices flow.

