How to Use the Photoshop Clone Stamp Non-Destructively


The Clone Stamp Tool in Photoshop is incredibly powerful for retouching and repairing images—but did you know it can also be risky to use? That’s because it’s a destructive tool, meaning it permanently alters your original pixels. But don’t worry! In this tutorial, I’ll show you how to use the Clone Stamp Tool in a non-destructive way, so you can make seamless edits while keeping your original image safe.
General Information about the Clone Stamp:
- The Clone Stamp Tool is used for duplicating (or “cloning”) parts of an image to another area of the same image or a different image.
- Once the source is selected, you paint over the target area to apply the copied pixels. The cloned area mirrors the texture, color, and detail from the source.
- You can adjust the size, hardness, and opacity of the brush for precise control, allowing for seamless blending with the surrounding pixels.
Applications:
- Removing Blemishes or Scratches: Great for cleaning up imperfections in portraits or old photos.
- Eliminating Unwanted Objects: Remove objects like wires, signs, or photobombers from a scene.
- Pattern Repetition: Extend patterns or textures naturally.
- Restoration Work: Repair and restore damaged or worn-out areas in photographs.
How to Use the Clone Stamp:
The Clone Stamp Tool was originally designed to be a destructive editing tool, as it directly modifies the pixels of the layer on which it is used.
Here’s how it works:
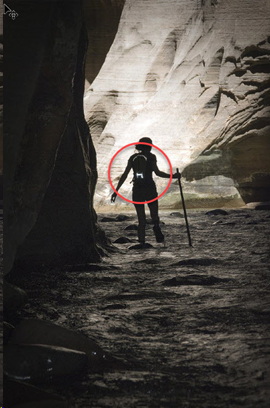
- Open an image in Photoshop. For this tutorial I am using PSE 2024 and a photo I took. The white reflections on the backpack bother me, and I would like to clone those away.
- In the Tools panel, under the Enhance Section, select the Clone Stamp Tool. It looks like a rubber stamp.

- In the Tools Options,
- Be sure the Clone Stamp is selected and not the Pattern Stamp.
- Uncheck Sample All Layers, if it is checked.
- Choose a round brush. The Hardness or Softness of the brush you choose determines upon what you are cloning. (If you see a harsh edge when you clone something, CTRL+Z, reduce the Hardness and try again.)
- Set the Opacity to 100% and Mode to Normal.
- Uncheck Aligned.
- Choose your Sample Point by holding down the Alt key or Option key on a Mac. Your cursor will change to a crosshair. Click on the area of the image you want to sample (the area you want to copy). In my case I clicked on a black area of the female silhouette.
- Start Cloning: Release the Alt/Option key and click or drag your mouse over the area you want to cover. (I clicked on the dark black spot around the female’s waist to clone the bottom white spot on the backpack, and then sampled another dark spot directly under the white curve to clone away the white curve.)
This was my result, which I’m happy with. BUT… I’ve altered the original pixels. I don’t know why I would ever want the original image back, but there may be a reason in the future. It’s just a good idea to always work on a copy and always keep your original image intact.

How to Use the Clone Stamp Non-Destructively:
To work non-destructively, we want to work on a blank layer.
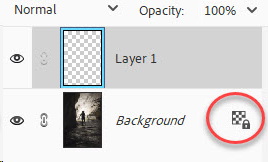
- Create a new layer for the Clone Stamp Tool by going to Layers > New Layer or by clicking on the Create a New Layer Icon above the Layers Panel.
- If your Background layer is locked, in the Layers Panel, click on the lock to unlock the layer
In the Tool Options, check Sample All Layers.
- Follow the instructions above in regard to opening your image, choosing your brush and brush settings, choosing your sample point.
- Before starting to clone, be sure the Blank Layer is your active layer, then clone..
Additional Tips:
- Use Undo (Ctrl + Z / Cmd + Z if needed.
- Zoom in for detailed areas and/or use smaller brush sizes.

