Photo Editing using Levels: the Basics
Save those less-than-perfect photos with the use of Levels.
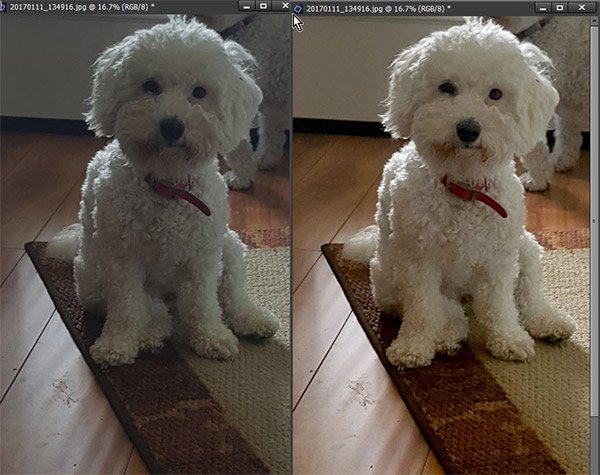
I took this photo of my dog, Stella with my cell phone, with the light directly behind her.
Let’s try to rescue this photo using a Levels Adjustment in Photoshop.

Step 1: Open Levels
In Photoshop Elements: In Expert Mode, in the Menu bar, go to Enhance / Adjust Lighting / Levels
In Photoshop: In the Menu bar: Image / Adjustments / Levels

Step 2: Set the White and Black Points
Our first goal is to reveal more detail in both the darker and lighter areas of the image, then we will adjust the mid-tones.
- Click on the white eyedropper to select it, and then click on the photo at the brightest, whitest spot you see.
- Click on the black eyedropper to select it, and then click on the photo at the darkest, blackest spot you see.
I clicked on the really light, white part of the fur on Stella’s hair, and on the black of her eye.
Tip: If you don’t like the result you get, you can keep clicking on the image until you find a result that you like.

Step 3: Set the Midtones.
That definitely looks better than the original image, but now let’s adjust the mid-tones. We do this by adjusting the middle slider in the Input Levels. Move the slider to the left to make the mid-tones lighter, and to the right to make them darker. By moving the mid-tone slider to the left just a bit, I was able to get an even better result. The amount you need to move the mid-tone slider will depend upon the lightness / darkness of your photo.
This is my result after adjusting the mid-tones.


Definitely better!
I hope you find this helpful and that it is a technique that will help you rescue photos that you thought were hopeless.

Comments (8)
You must be logged in to post a comment.
*THANK YOU* for making this tutorial available as a PDF. I prefer to have written instructions in front of me rather than need to tab back and forth between window screens!
You’re welcome, Shelley! Thank you for letting me know that you like that! I appreciate it!
Wow! I’ve used the input middle slider before, but most of the time wasn’t completely happy with the results. Never knew how to use the eyedroppers before! Now I’m anxious to try and see better results. Thank you so much!
I’m glad this was helpful for you, Kathi! Thanks for letting me know.
Thanks so much for all these helpful hints. I enjoy learning a newer and better way to do edit my photos.
Oh, great! Thanks for letting me know, Deb!
I learned something new! So glad I read this tutorial and how to use the eyedroppers. I used the sliders previously but now I’ll be able to use the eyedroppers the next time I need to adjust a photo. Thank you!
I’m glad it helped, Ruth!