DIY Dictionary Art


Create your own Dictionary Art
In the world of art, creativity knows no bounds. It finds inspiration in the most unexpected places, and one such unique and charming form of creative expression is dictionary art. Whether you’re an aspiring artist, a seasoned creative, or simply someone looking for a new, enjoyable hobby, dictionary art offers a captivating avenue to explore. In this blog post, we’ll delve into what dictionary art is and I’ll take you step-by-step through the process.
What is Dictionary Art?
Dictionary art, also known as altered book art or book page art, involves repurposing old or discarded dictionaries, encyclopedias, or any other vintage books to create visually stunning pieces of art. Artists and crafters transform the pages of these books into canvases for their imaginative ideas. It’s a form of mixed media art that merges the written word with visual artistry to produce unique and aesthetically pleasing compositions. The great news is that you can create this type of art with paper, glue, and other art supplies, or you can create it digitally.
Create a Dictionary Sports Print
Creating this type of art of totally subjective. You have the flexibility to make so many choices. Here I will walk you through the choices I made when creating my Taekwondo Dictionary Print. (I am using Photoshop CC2024, but the principles are the same in Photoshop Elements.)
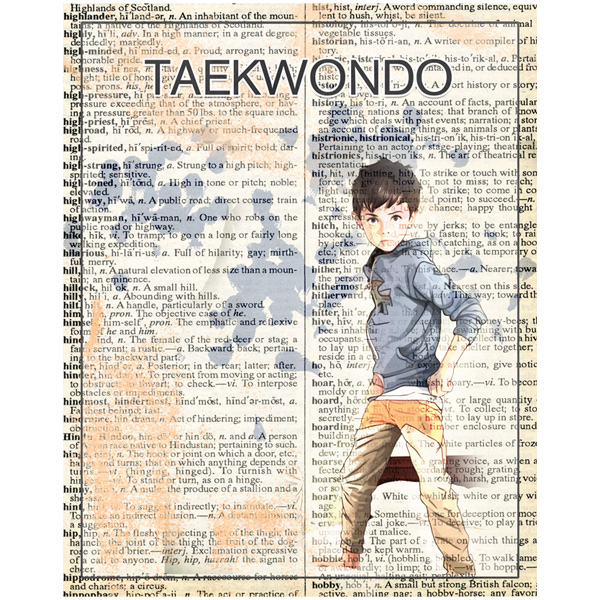
- I opened one of my Dictionary Prints, but you can use any dictionary prints that you have scanned. (Just be aware of copyright issues if you are using your finished product for anything other than your personal use). I chose the “H” Dictionary Print because the word “high-spirited” was visible on the print and is a perfect word to describe my grandson, Owen, whose image I am using.
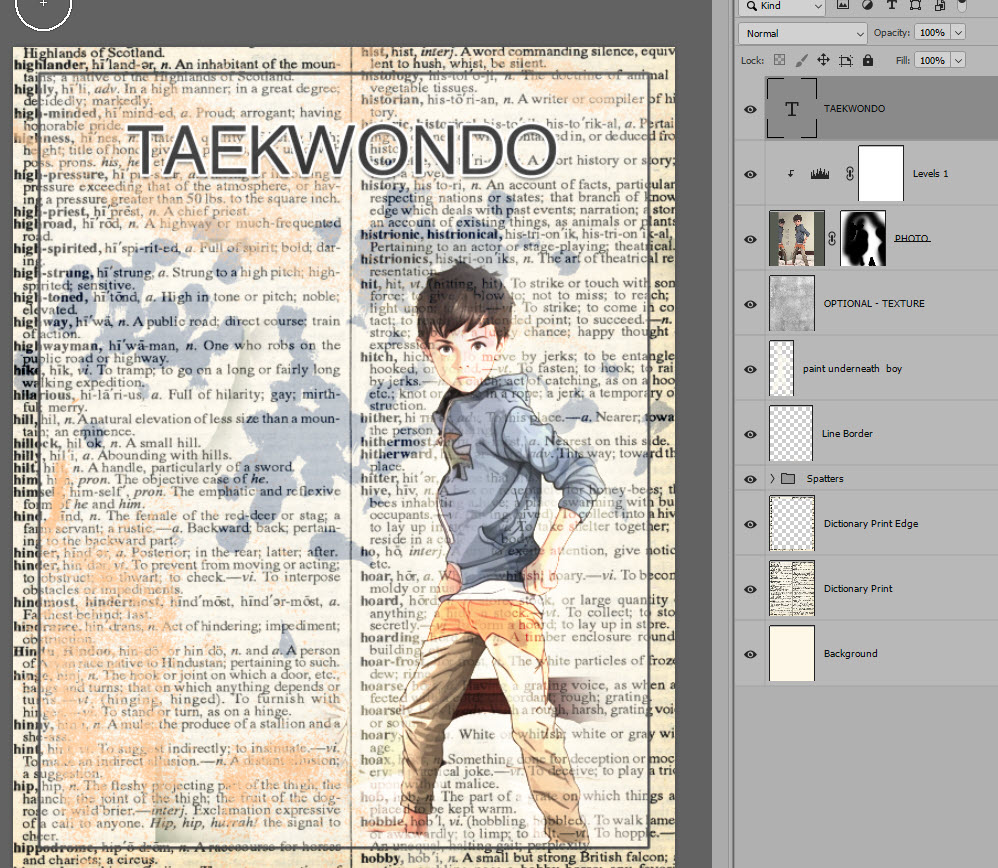
- Open the photo you want to use and, in the Layers Panel, place it on a layer above the dictionary paper. Experiment with Blend Modes of the photo until you see something you like. I chose Hard Light because it hid part of the photo background, and I liked the look it gave to the image itself.
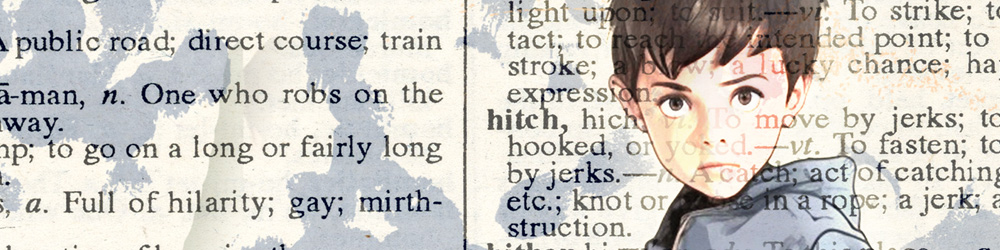
- Next, I wanted to get rid of the hard edges of the photo that were still visible. I could have erased them, but prefer to use a Layer Mask, since it is a non-destructive method. In the Layers Panel, click on the photo layer to make it active. Add a Layer Mask. Set the Foreground Color to Black. Select a Soft Round Brush. Choose the brush size most appropriate for your image; I chose a 150 px brush. On the document, paint away the part of the background you don’t want to be visible.
- I did want the image to be a little darker, so added a Levels Adjustment. You may not have to do this, depending on the image that you use.
- I wanted to remove a bit of the dictionary print from the image, especially the boy’s face and the main part of his body. To do this, in the Layers Panel, I created a blank layer below the photo. Next, I used the Color Picker to sample the ivory color from the dictionary paper. I selected a soft round brush and painted on the blank layer where I wanted to hide some of the print.
- I wanted to add a thin border near the edge of the print. To do this:
• Press CTRL and, in the Layers Panel, click on the Thumbnail of the Dictionary Print to select it.
• In the Menu Bar: Select > Modify > Contract. I chose to contract by 100 pixels. Check “Apply effect at canvas bounds.” Click OK.
• Create a new Blank Layer above the Dictionary Print.
• In the Menu Bar: Edit > Stroke. I chose a Width of 10 px. Click inside the Color Picker and choose the color you want for your Outline. Click OK. - I added the TAEKWONDO title using the A750-Sans font, with a 10 px Outside white Stroke and a slight Drop Shadow.
- I decided some spatters would add to the overall look of the page. To do that, I created a blank layer below the photograph and added some brush strokes using colors I sampled from the image. You can use any brushes that you like or premade spatters or graffiti that you already own.
- As a final touch, I wanted to have the dictionary edges just a little darker than the main part of the print. To do this: Click on the dictionary paper layer to make it active. Get the Rectangular Marquee Tool and drag out a section, using the Border as your guide. In the Menu Bar: Select > Inverse. Then CTRL J to create a copy of the dictionary page edges. In the Layers Panel, choose a Blend Mode that you like. I chose Multiply and lowered the Opacity to 85%.
- I also added a Texture layer, with a Blend Mode of Soft Light, but this would be optional.
Are you a visual learner? Watch me recreate this page on my YouTube Channel.
Find the Dictionary Prints A-Z mentioned in this post and video at Karen Schulz Designs | GingerScraps | Oscraps.
I would love to see what you create! Show off your work in my Karen Schulz Designs Facebook Group or contact me directly through my Contact option.
Subscribe to my weekly Newsletter so you don’t miss out on new products, tutorials, or gifts.

